


NOTE: The Security Officer 1has the ability to manage those user IDs that are a ‘Producer SO2’ or ‘Producer User’. However, they would be unable to manage user IDs that have the same role as yourself ( ‘Producer SO1’). If your agency has a ‘Producer SO2’, they would not be able to manage ‘Producer SO1’s or other ‘Producer SO2’s, but they would be able to manage user IDs that are a ‘Producer User’.

How to Create & Manage User IDs
We recommend that everyone have their own user ID for the myGeoSource website. The initial user ID sent to your agency during the appointment process was set up as the “Security Officer 1” for the agency and has permission to create and maintain user IDs.
How to Create Additional User Ids
Below are instructions for the agency’s Security Officer 1 to create additional user IDs and set permissions.- Log in to MyGeoSource.
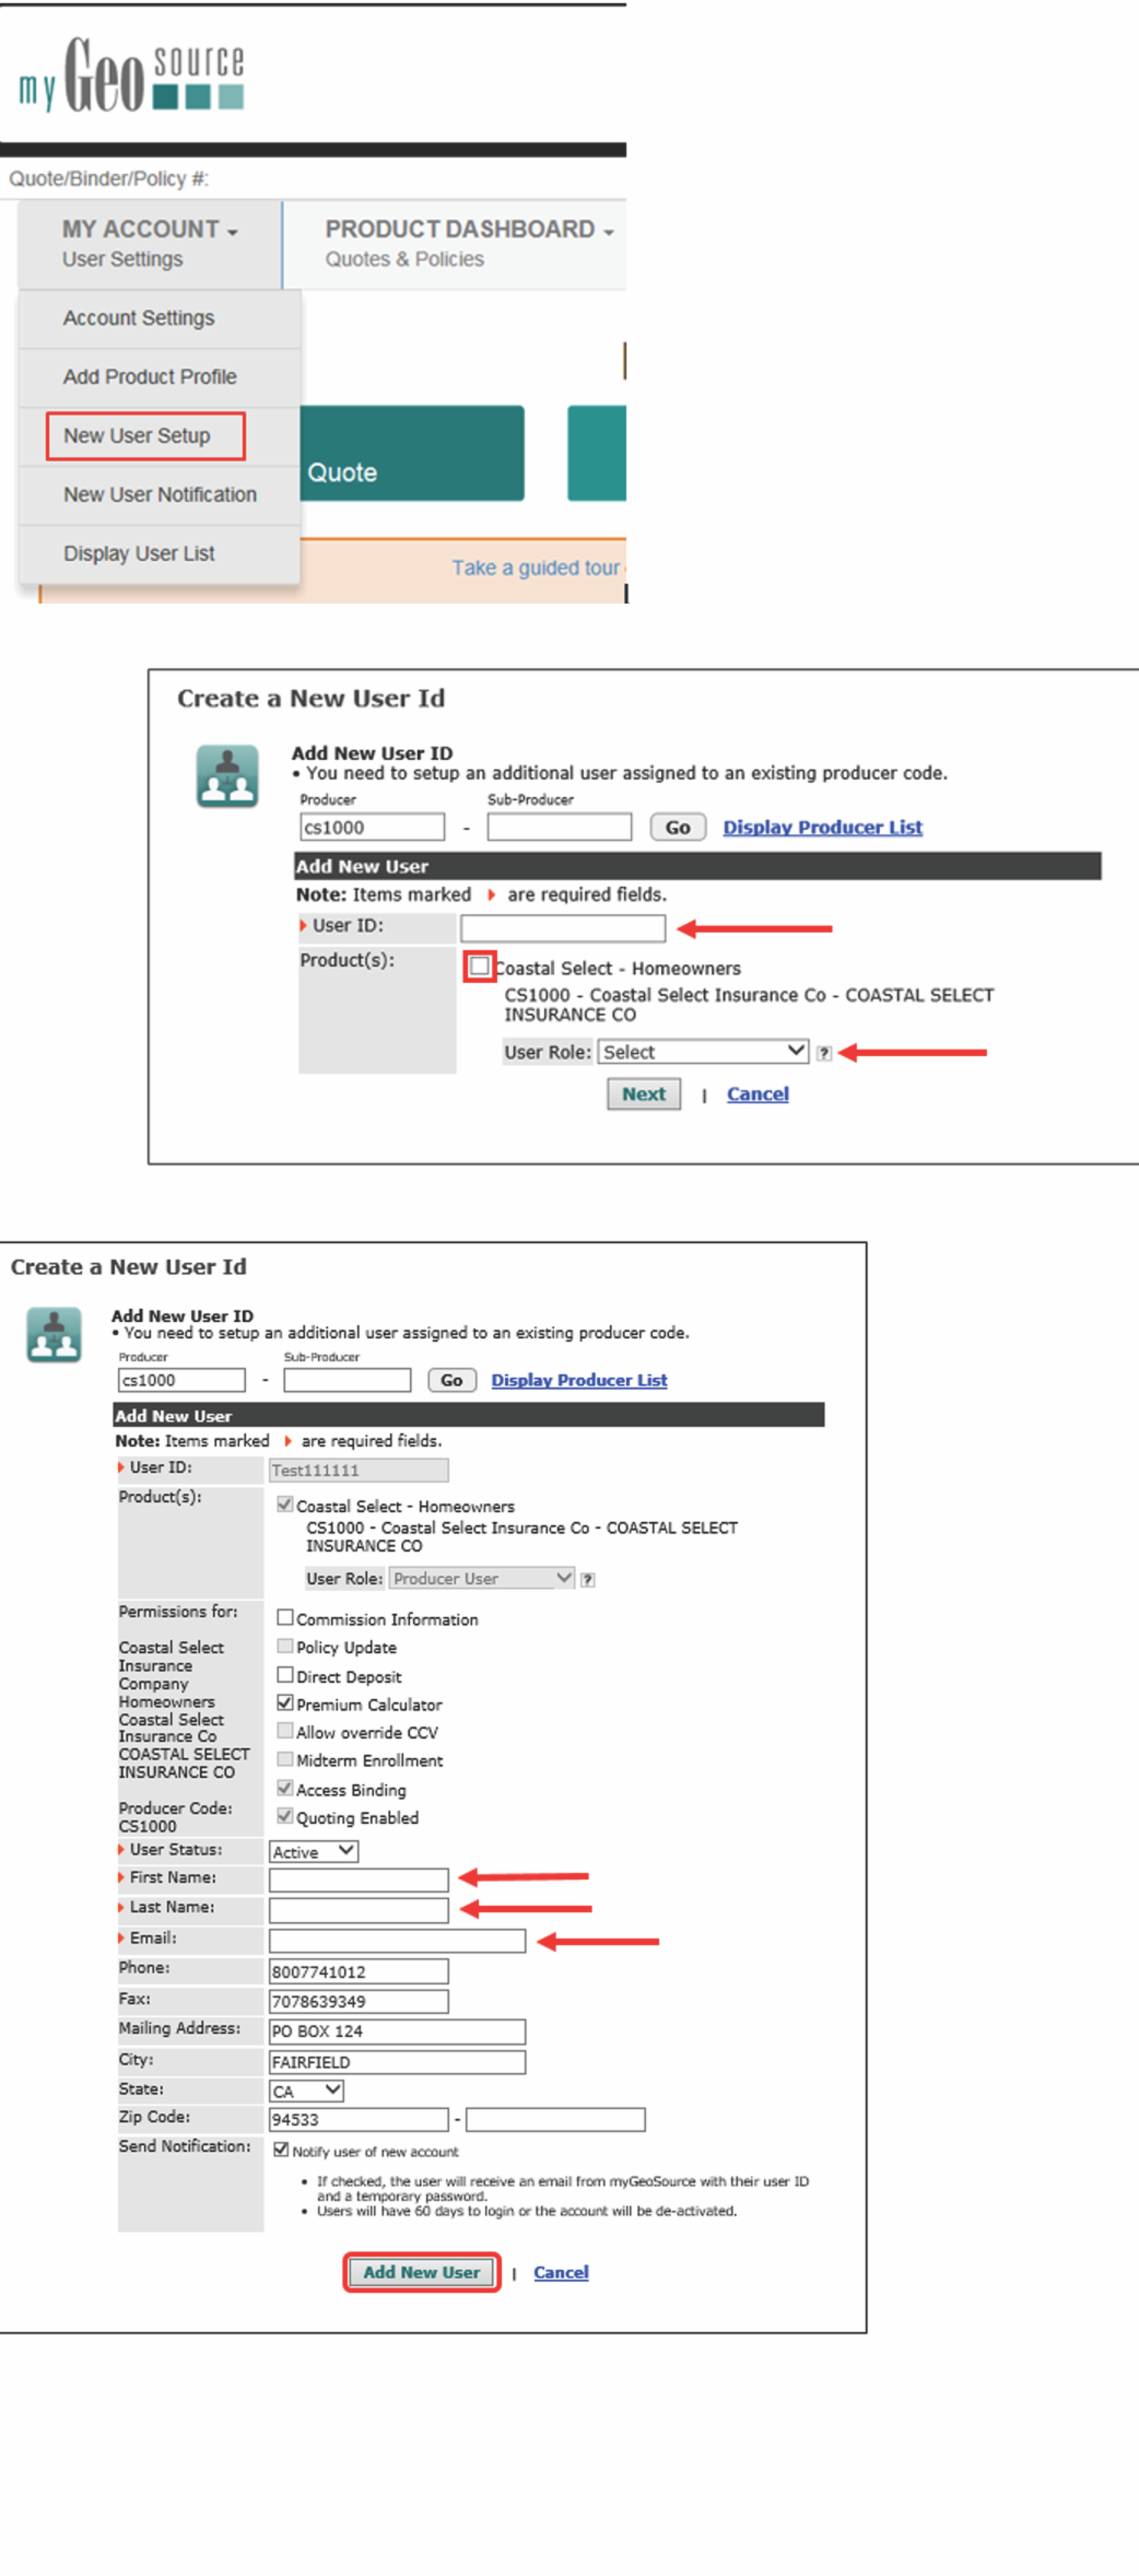
- Click on “MY ACCOUNT” in the upper left-hand corner.
- Select “New User Setup”.
- In the Create a New User ID box, enter your producer code in the box underneath “Producer” and click “Go”.
- Enter a unique user ID for this person.
- Check the boxes to confirm the products you want the user to have access to.
- Under “User Role”, most individuals that only need access to quote on the website should be assigned as “Producer User” from the dropdown menu. If you have an office admin or an individual that would help create additional user IDs and maintain the agency’s general users, you would want to select “Producer (Security Officer) SO 2” for the user role. Click “Next”.
- The permissions granted to the user ID are based on the user role selected on the previous screen. Review the additional permissions (such as if the user might need access to commission information or need to update the direct deposit information on file for the agency) and place a checkmark in the box next to the additional permission this user may need.Enter their first name, last name, and email address.
- Click “Add New User”. The new user will receive an email from agentsupport@geovera.com that provides the new user ID along with a link so they can establish a password and password hint.
How to Manage Existing User IDs
The agency’s Security Officer is responsible for managing the agency’s existing user IDs that rank lower than their user role. If someone has left the agency, your Security Officer can follow the below steps to find and inactivate their user ID.- Log in to MyGeoSource.
- Click on “MY ACCOUNT” in the upper left-hand corner.
- Select “Display User List”.
- Search for user IDs using criteria such as first/last name or email. Alternatively, you can see a list of all user IDs associated with the agency by clicking “All” at the end of the alphabet. If any users were recently added or changed, it could take up to 15 minutes for those changes to display.
- For the user ID that needs to be inactivated, click on that user ID.
- Scroll down the Account Settings page until you see “User Status”. Click on the dropdown menu next to it and select “Inactive”.
- Click “Save Changes” to inactivate the user ID on the myGeoSource site.
How to Change a Password
- Login and hover over “MY ACCOUNT”, choose “User Profile”
- Click “Change Password”
- Enter your current password, a new password and confirm the new password.
- A new password hint is required. The password hint is a term that you create to help you remember your password if you use the “Forgot password” function on the login page.
- Click “Update Password” to complete the process.
How to Reset a Password
- Login and hover over “MY ACCOUNT”, choose “Account Settings”.
- Security Officers can reset passwords for other users. Enter the User ID in the Security Officer options section on the “Account Settings” page, and click “Search User” to locate the Account Settings.
- Click “Reset Password” and “Reset”
- The user will receive an email from agentsupport@geovera.com that will contain a link to access myGeoSource.com
- After clicking the link in the email, the user will be prompted to create a new password and assign a new password hint. Note: this email is only valid for 24 hours. And the link in the email will only work once.
How to Link Existing Accounts with a Single Sign On
If you have access to multiple GeoVera products, you can link your account logins with a “Single Sign On”, so that you have fewer passwords to remember. Each individual user can follow the steps below to link their accounts- Login and hover over “MY ACCOUNT”, choose “Add Product Profile”
- Enter the user ID and password for all other logins you wish to have access to under one user ID
- Select the user ID you will use as your Single Sign On. This will be used to login to access all of your linked accounts from www.myGeoSource.com. The remaining user IDs will be deactivated and no longer be used.